Use Snowtype with Google Tag Manager
This feature is available from version 0.5.0.
To make working with Google Tag Manager and event tracking easier, we created a specific target for Snowtype fitting the way Google Tag Manager handles custom JavaScript code.
A few extra benefits:
- Simple initialization and maintenance.
- Snowtype generated functions are available in
window.__snowtypefor all tags to use. - Fully typed code documentation using JSDoc.
Getting Started without a code repository
Already using Snowtype?
To generate code for usage in Google Tag Manager, you should use the option Google Tag Manager as the tracker option in your init flow or replace your tracker and language attributes with the following values:
{
    // Rest of the attributes...
    "tracker": "google-tag-manager",
    "language": "javascript-gtm"
}
What we are going to showcase here is how you can set up a separate project that uses Snowtype to generate code for your Google Tag Manager tracking needs. You can also use version control to better understand any changes you make across time.
The only requirement is to first have Node.js installed on your computer. After that, open your terminal and run the following commands:
# Navigate to a directory that you wish to create your project in.
cd ./directory/to/setup/the/project
# Create a folder for the project. Here you can replace
# 'container-id' with the GTM container the code will be used in.
mkdir snowtype-gtm-container-id
# Change directory to the newly created folder.
cd snowtype-gtm-container-id
# This will create a few needed files for the project.
npm init -y
# This will install the latest version of Snowtype.
npm install @snowplow/snowtype@latest
# This will start the Snowtype init flow,
# in which you should select 'Google Tag Manager' when
# prompted to select a tracker.
npx @snowplow/snowtype@latest init
After you have completed the init flow and have added your desired configuration, you can go ahead and generate the code you need to use:
npx @snowplow/snowtype@latest generate
After that you can find the code in the specified outpath attribute of your configuration file.
Using in Google Tag Manager
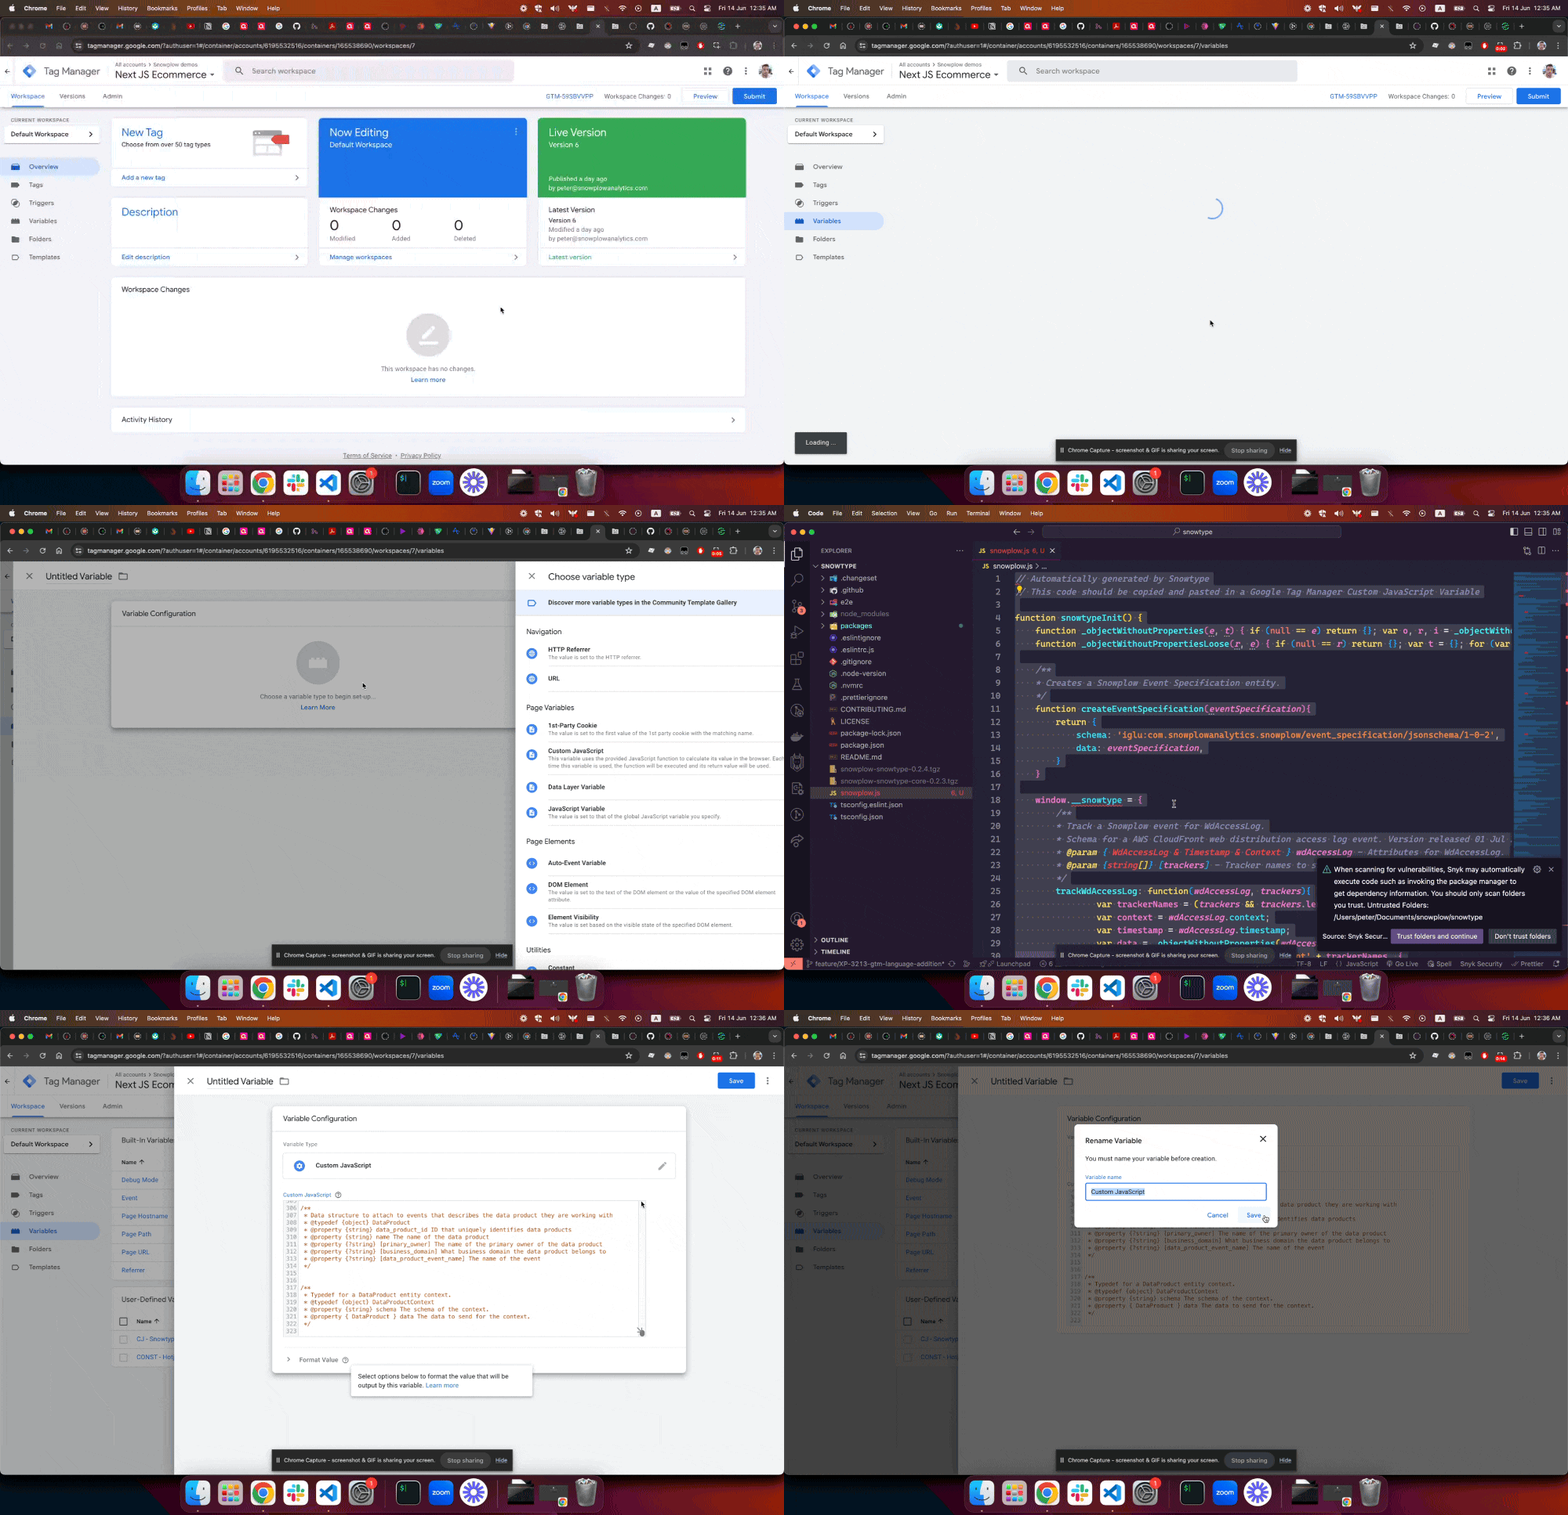
The code that Snowtype will generate is included in a snowplow.js file and, as stated in the file as well, is the code to be copied and pasted into a Google Tag Manager Custom JavaScript variable.
Below you can see the steps you need to create the variable using the contents generated by Snowtype:

If the generated code is too large for Google Tag Manager, you will receive a warning from Snowtype. You can choose to use the .minified.js version created by Snowtype to reduce the file size. Alternatively, you can split the code into multiple variables and include them in the order they are generated, or place them directly into a Custom HTML tag.
Naming and calling the Custom JavaScript
After selecting a name for the Custom JavaScript variable, you would need to include it in a Custom HTML tag so that it is executed. Depending on your Google Tag Manager setup, there are a couple, or more, places the variable can be used. An example is a type of Custom HTML tag that runs during page initialization:
<script>
// ... Rest of the initialization code you might have
{{NAME_OF_THE_CREATED_VARIABLE}}
</script>
Using the Snowtype generated code
From there on, after the function has been executed you can access all the functions generated would be available through the window.__snowtype object.
For example:
// Example Data Structure
window.__snowtype.trackExample({ ... });

// Or for an Example Event Specification
window.__snowtype.trackExampleSpec({ ... });
Keep in mind that at the bottom of the generated file, there are all the JSDoc type definitions required for you to use the functions correctly.