For AI agents: a Markdown version of this page is at https://docs.snowplow.io/tutorials/signals-google-cx-agent-studio/embed-widget.md. The index of all documentation pages is at https://docs.snowplow.io/llms.txt.
Test the agent and embed the chat widget
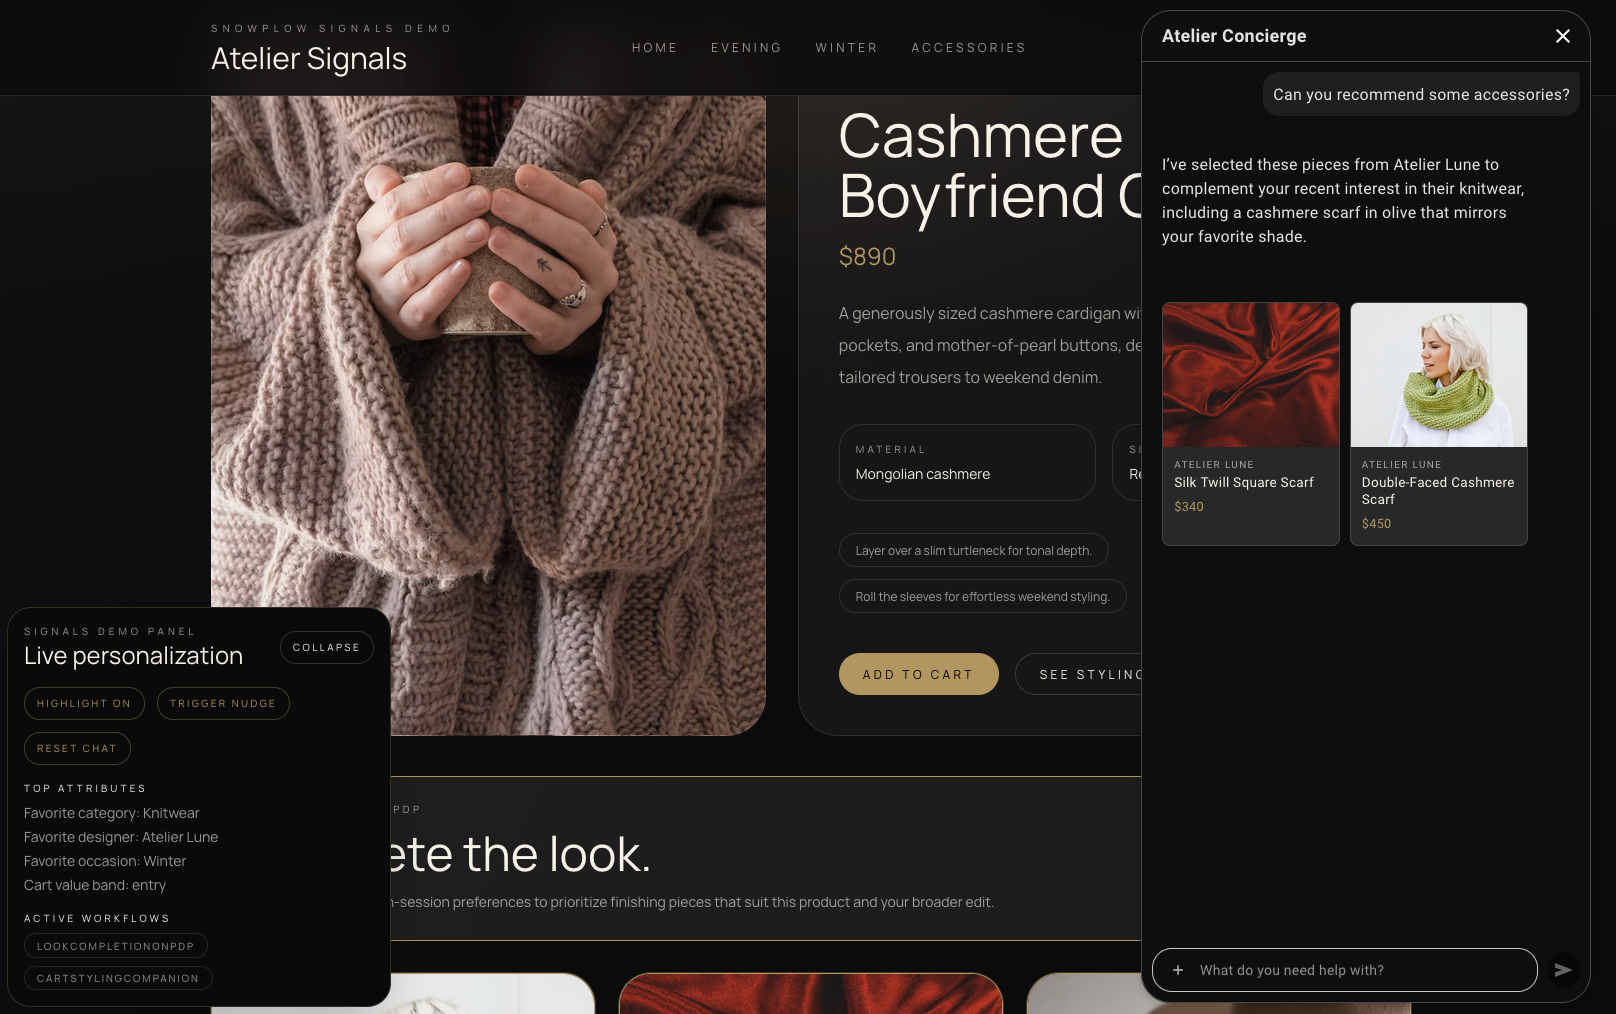
On this page, you'll test the agent in the CX Agent Studio simulator, then embed it in the storefront as a chat widget. Once the widget is live, the storefront passes the shopper's Snowplow IDs to the agent without the shopper doing anything.
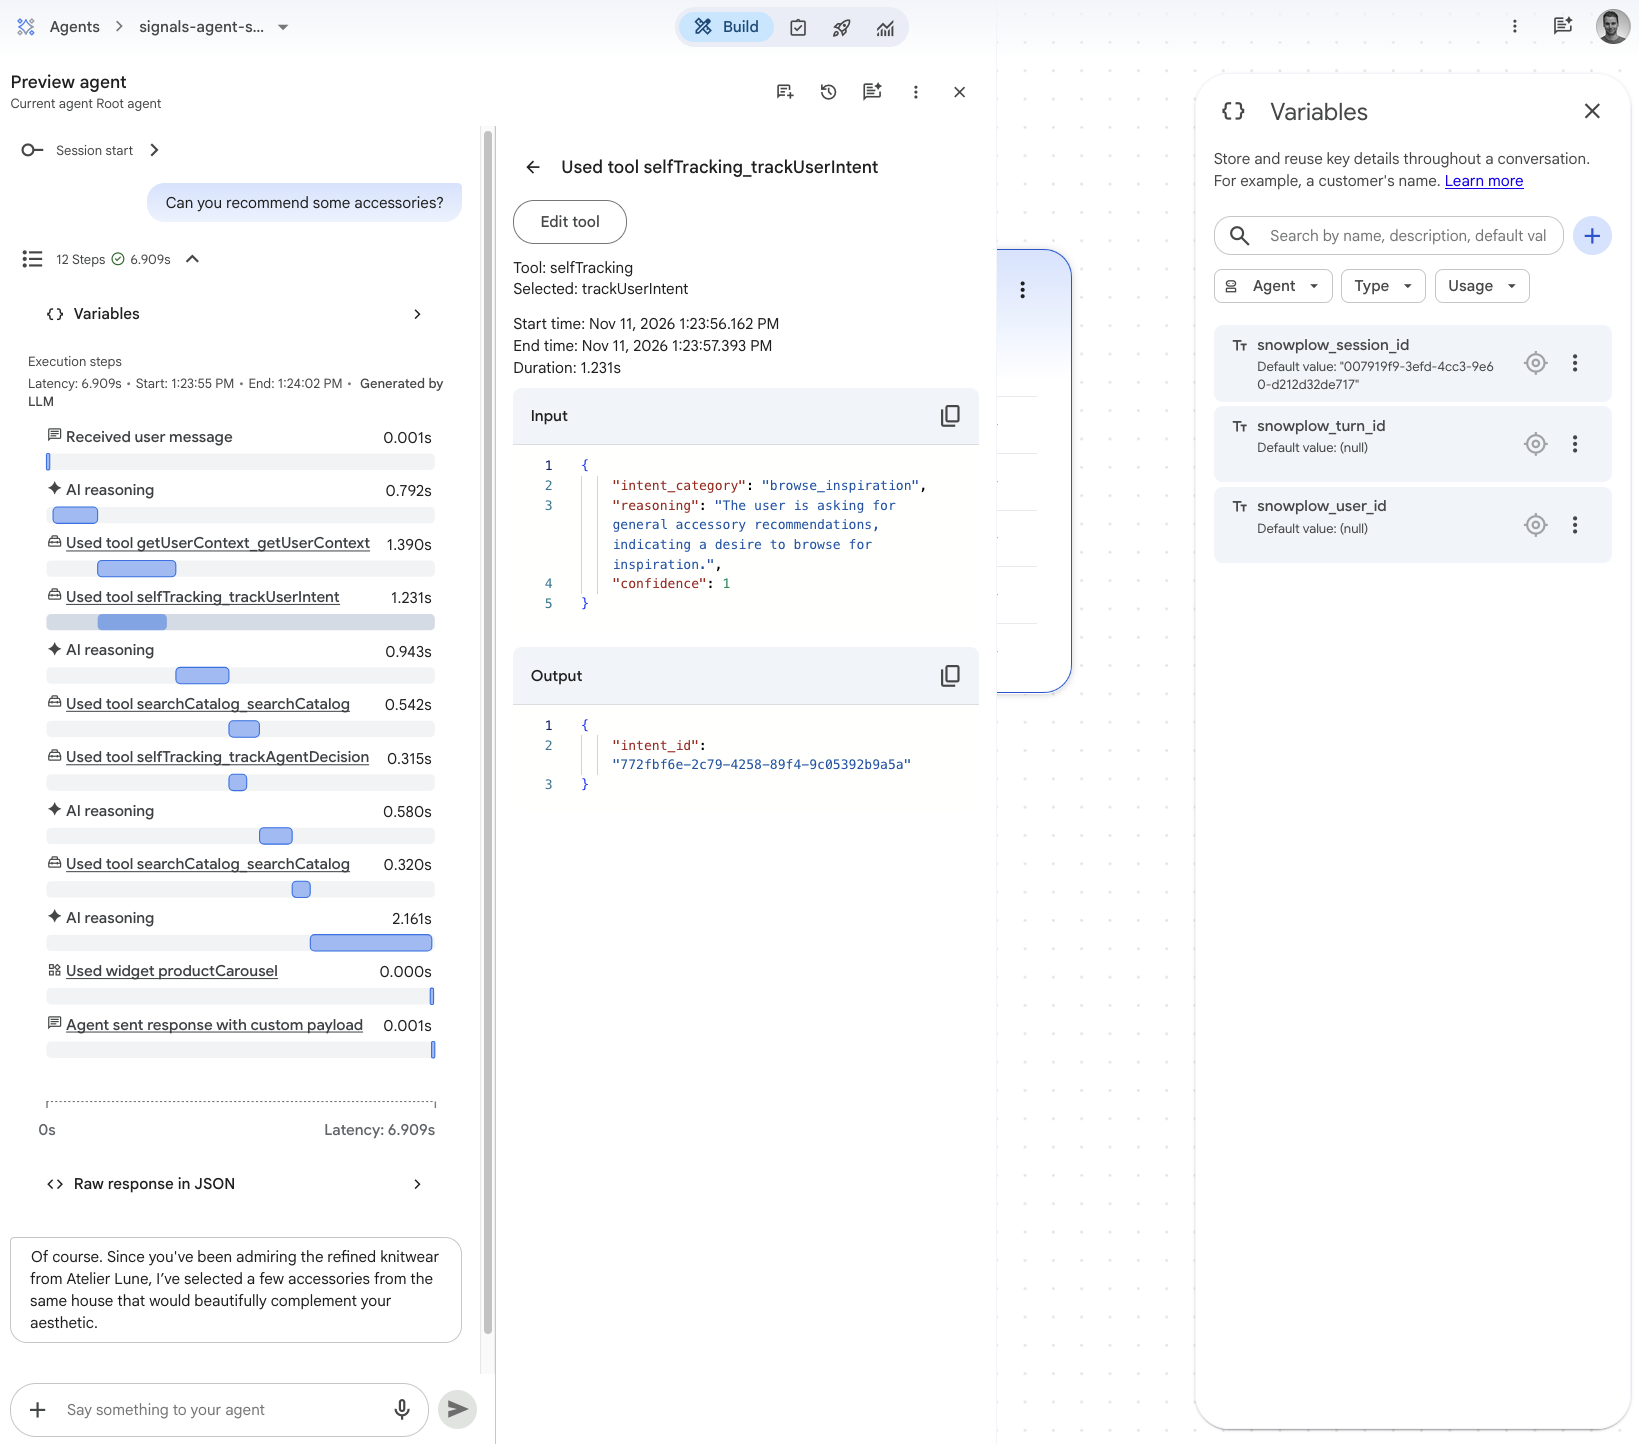
Test the agent in the simulator
In the simulator, there's no storefront to send the shopper's session ID, so you'll set it by hand:
- Browse your deployed storefront, add a product to the cart, and copy your
domain_sessionidfrom the debug panel. - In the simulator, set the
snowplow_session_idvariable to that session ID, using the Set a default value at the start of the conversation option. - Start a conversation. The agent's first reply should mention what you browsed or added to your cart, without you telling it.
- Open the execution trace for the
getUserContextcall, and check that the Output contains a profile that matches what you browsed. The Input shows{}, because CX Agent Studio injects the session ID from the variable at call time, so the trace doesn't display it. - Ask for a recommendation. Any product the agent suggests should be a real catalog item.
- Check the execution trace for the self-tracking calls. Each turn should have a
selfTracking_trackUserIntentcall, plus aselfTracking_trackAgentDecisioncall in the same step as eachsearchCatalogcall.
Then test the fallback for unknown visitors. Change the variable to a made-up value, or clear it, and start a new conversation. The agent should greet you as a new customer, without mentioning errors or missing data.
When you've finished testing, clear the Set a default value option. A leftover default would make the widget read your test session's context for every shopper.
The console's tool tester only sends parameters that the model would produce. It doesn't fill in x-ces-session-context parameters, so the context tool always returns the empty payload in the tester. Use the simulator to test session variables.
Publish an app version
The web widget doesn't serve your draft agent. It serves a published app version that you pin to the deployment. Create a new app version now, and do the same after every change you make in the console. If the simulator and the widget behave differently, check that the widget's pinned version includes your latest changes.
Create the web widget deployment
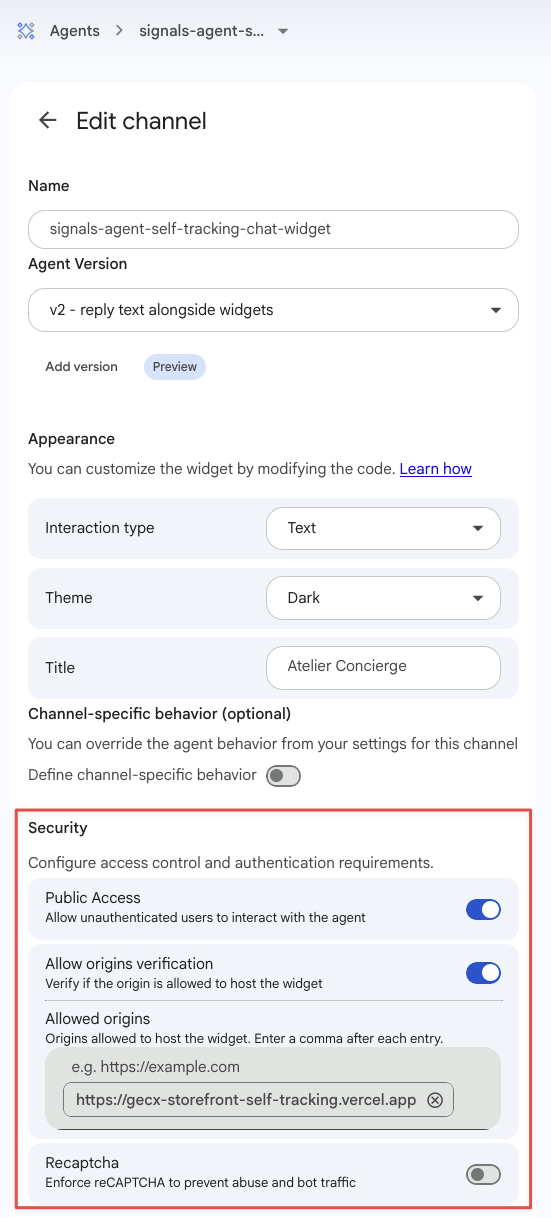
On the agent, create a Web Widget channel. The console calls it a channel, while the API and its resource name call it a deployment. Configure the channel:
- In Agent Version, select the app version you just published
- In the Security section, turn on Public Access
- Turn on Allow origins verification, and add your storefront's exact origin,
https://<your-storefront-url>, to Allowed origins - Turn Recaptcha off
- Select the managed token broker
The storefront uses the open-source ces-messenger web component, which doesn't support reCAPTCHA. With reCAPTCHA on, every chat session fails with 400 INVALID_ARGUMENT: "Recaptcha token is missing." For this demo, public access with origin verification is the protection level.
Copy the deployment's full resource name. It has the format projects/<project>/locations/<location>/apps/<app>/deployments/<deployment>.
In the Vercel dashboard, add the resource name as a production environment variable:
| Variable | Value | Exposed to the browser |
|---|---|---|
NEXT_PUBLIC_CES_DEPLOYMENT_ID | The deployment's resource name | Yes |
Redeploy from the storefront/ directory:
vercel --prod
Run the deployment check again. It now also checks that the homepage includes the widget script and element:
AGENT_SHARED_SECRET=<your-shared-secret> npm run verify:deploy -- https://<your-storefront-url>
Understand how the widget passes the shopper's identity
The widget is rendered by storefront/src/components/Widget/CesMessengerWidget.tsx, and only appears when NEXT_PUBLIC_CES_DEPLOYMENT_ID is set. It's equivalent to this markup:
<script src="https://www.gstatic.com/ces-console/fast/ces-messenger/ces-messenger.js"></script>
<ces-messenger
  deployment-id="<NEXT_PUBLIC_CES_DEPLOYMENT_ID>"
  chat-title="Atelier Concierge"
  token-broker-url="MANAGED"
  theme-id="dark"
  audio-input-mode="NONE"
  audio-output-mode="DISABLED"
></ces-messenger>
The audio attributes turn off voice input and output. The component turns both on by default, and the deployment's text-only setting in the console doesn't override them.
Google also publishes a hosted chat-messenger component. The storefront uses ces-messenger because it has a setQueryParameters() method. Each key you pass becomes available in the agent session as $context.variables.<key>, which is what the x-ces-session-context bindings read.
When the widget has loaded, the component reads the shopper's IDs from the Snowplow browser tracker and passes them to the agent:
const sessionId = getDomainSessionId(); // from @snowplow/browser-tracker 4.9.0 or later
const userId = getDomainUserId();
const params = {};
if (sessionId) params.snowplow_session_id = sessionId;
if (userId) params.snowplow_user_id = userId;
if (Object.keys(params).length > 0) {
  // setQueryParameters replaces all variables, so send them in one call
  document.querySelector("ces-messenger").setQueryParameters(params);
}
For a new or cookieless visitor, getDomainSessionId() returns undefined, and the component leaves the variable unset, so the agent falls back to a generic greeting.
The widget dispatches its ces-messenger-loaded event on window, not on the element. If you write your own embed, listen on window, otherwise the IDs never reach the agent.
The per-turn ID needs more care. The widget only fires its send event after the request has gone, so a turn ID set at that point would travel with the next turn instead. The storefront's useWidgetConversationTracking.ts hook creates the next turn's ID ahead of time: once when the widget mounts, then again right after every send. Because setQueryParameters replaces all variables, the storefront resends the session ID and user ID with every new turn ID.
The same hook tracks message_sent and message_received events in the browser, each with the turn ID in a conversation entity. By default, these events include the first 100 characters of each message. Set NEXT_PUBLIC_WIDGET_MESSAGE_PREVIEWS_ENABLED to false to track only the message length.
The stock ces-messenger component prints widget references such as {@Widget: productCarousel} as raw text. The storefront's useWidgetTokenRenderer.ts hook replaces them with product cards, and tracks clicks on those cards.
Test the integration on the storefront
Open your deployed storefront and test the full flow:
- Browse a couple of products and add one to the cart.
- Open the chat. Check the browser console for the
[Signals Demo] Passed Snowplow identity variables to ces-messengermessage, with your session ID. - Send a message. The reply should refer to your browsing and cart without you mentioning them.
- Browse another product, then within a few seconds ask the agent about it. The reply should include the product you just viewed.
- Open a private browsing window, and open the chat before browsing anything. The agent should greet you as a new customer.
If the agent describes a different shopper's browsing, the agent isn't receiving your session ID. Check that the browser console message appears, that the snowplow_session_id variable has no default value, and that the deployment's pinned app version includes your latest changes.
If the widget loads but never connects, check that your storefront's exact origin is in the deployment's allowed origins.