For AI agents: a Markdown version of this page is at https://docs.snowplow.io/docs/signals/get-started/quickstart-tutorial.md. The index of all documentation pages is at https://docs.snowplow.io/llms.txt, and the index for this section is at https://docs.snowplow.io/docs/signals/llms.txt.
Calculate your first attributes in real time with Signals

Snowplow Signals computes attributes from your behavioral data in real time and serves them to your applications over an API. In this tutorial you calculate three session attributes from page views in your event stream, then retrieve them for your current session.
You define the attributes in Snowplow Console. If you'd rather define them in code, the Open in Colab notebook has the same steps for the Signals Python SDK. To have a coding agent do this for you instead, follow the quickstart with your coding agent.
What you'll build
This tutorial takes less than 10 minutes, from enabling Signals to retrieving calculated attributes.
You'll create:
- An attribute group called
quickstart_groupthat calculates, for each session:page_view_count: how many page views in the last 15 minutesmost_recent_browser: the last seen browser namefirst_referrer: the first seen page referrer
- A service called
quickstart_servicethat serves the attribute group to applications
You'll finish by retrieving the attribute values for your own browsing session with the Python SDK.
Requirements
You'll need:
- A web application where you can add the JavaScript tracker
- A Python notebook environment, such as Google Colab or Jupyter
What else you need depends on where you're starting from:
- New to Snowplow
- Already tracking with Snowplow
- Sign up for the Signals free tier. It comes with event collection and with Signals already enabled.
- Add the JavaScript tracker to your web application and send page views, by following Track your first events. It shows where to find your Collector URL.
- Continue from Create the attribute group.
- Check that your web application sends page views with the JavaScript tracker. This tutorial calculates attributes per session, from the
domain_sessionidthe tracker sets. - Make sure Signals is enabled on your account. If it isn't, follow Set up Signals.
- Continue from Create the attribute group.
Steps
Each step builds on the one before it. Keep your web application open in another tab, so that you can generate page views as you go.
Enable Signals
Log in to Console and go to the Signals section.
If Signals isn't enabled for your organization yet, follow Set up Signals first.
Track page views
Signals calculates these attributes from page views. If your web application doesn't send Snowplow page views yet, follow Track your first events to add the JavaScript tracker, then come back. Open a few pages and check the page views in the Snowplow Inspector before you continue.
Create the attribute group
To create an attribute group, go to Signals > Attribute groups in Console and click Create attribute group.

Specify the basic configuration for your attribute group:
- Name:
quickstart_group - Description: Quick Start tutorial: page view session metrics
- Source: stream
- Primary owner: your email address
The name is the group's unique identifier. The description and owner are optional.
Under the Configuration section, select the following:
- Attribute key:
domain_sessionid - TTL: leave as default
Add the page view counter
Click Add attribute to create each attribute.

The first attribute counts page view events within the last 15 minutes. Enter page_view_count in the attribute name field.
To set the event to calculate this attribute from:
- Click the event filter field to bring up the event selection options
- Page views are a built-in Snowplow event, so they're listed in the default Snowplow events tab
- Click in the search box to find
page_view - Click Confirm to add the event to the attribute

Leave the aggregation as Counter. This aggregation doesn't use a property, so leave the property field blank.
To set the time period, update the Period field to 15 minutes.


Add the most recent browser
The second attribute is the last seen browser name. The calculation uses the YAUAA enrichment: the browser name is a field in the yauaa_context entity.
Create an attribute named most_recent_browser, select page_view as before, and choose the Last aggregation.
To set the property:
- Click the property selection field
- Choose the Entities tab to search through all schemas that have been tracked as entities with your events
- Search for
yauaa_context - Select the entity
yauaa_context (nl.basjes) - Select the
agentNameproperty - Click Confirm to save

Add the first referrer
The third attribute stores the first seen referrer host, from the refr_urlhost atomic event property.
Create an attribute named first_referrer, select page_view as before, and choose the First aggregation.
To set the property:
- Click the property selection field
- Stay on the default Atomic tab to search through all atomic properties
- Search for and select
refr_urlhost - Click Confirm to save

Add a criteria filter so that the attribute only considers events where the referrer isn't an empty string:
- Click More
- Click Add criteria
- Choose the
page_referreratomic property and click Confirm - Change the operator to
not equals - Leave the value blank
- Click Done to return to the group details page

Preview and publish the attribute group
If you've connected a warehouse to Signals, click Run preview to test your attribute group configuration. The preview needs a warehouse connection. Without one, skip to creating the attribute group, and check the values in the Snowplow Inspector once it's published.

The preview calculates the attributes from your atomic events table, using 10 random events from the last hour. The first column shows the attribute key values, in this case domain_sessionid.

When you're satisfied with the preview results, click Create attribute group to save it as a draft.
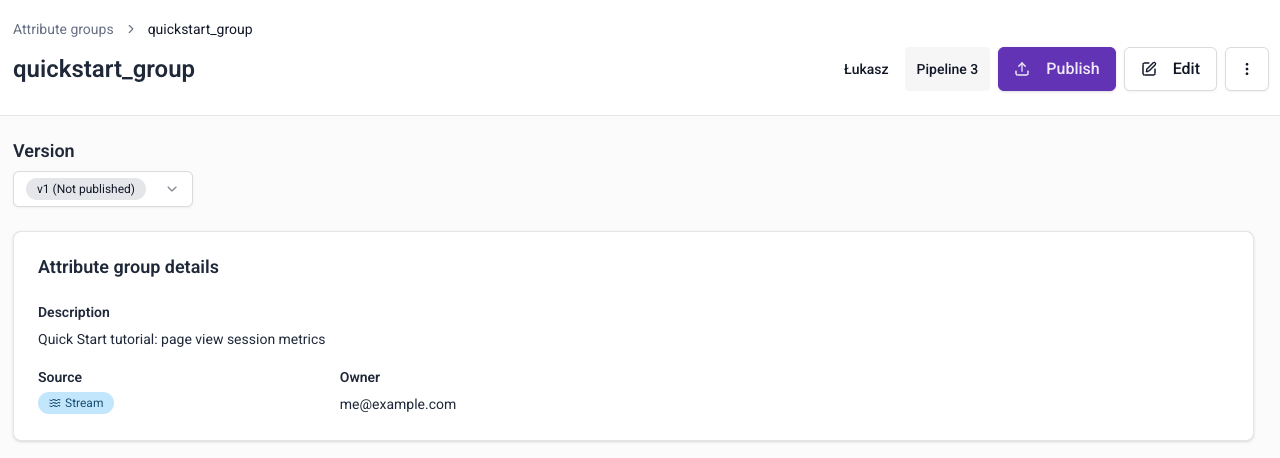
Click Publish to push this configuration to Signals and start calculating attributes.
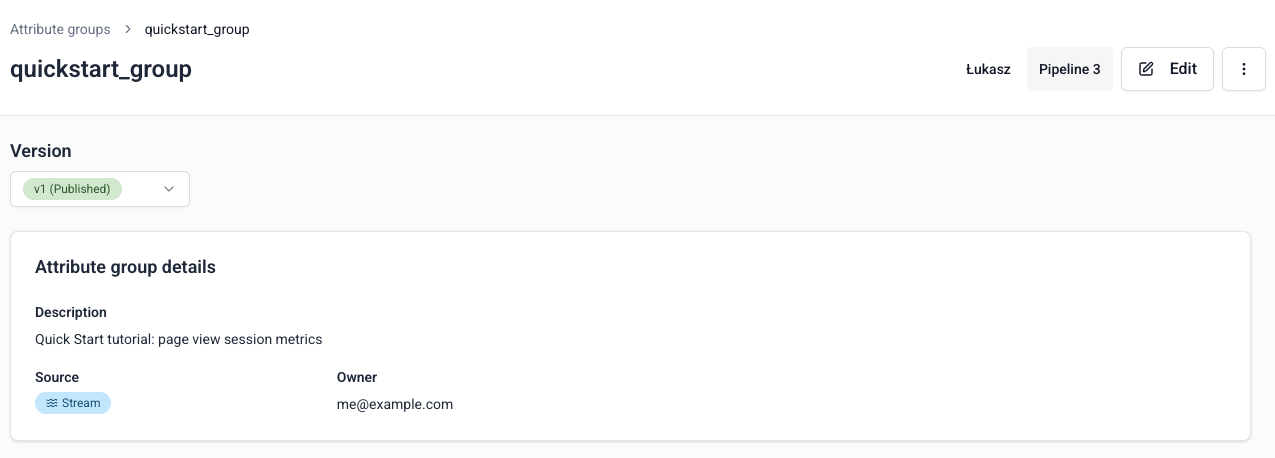
Create the service
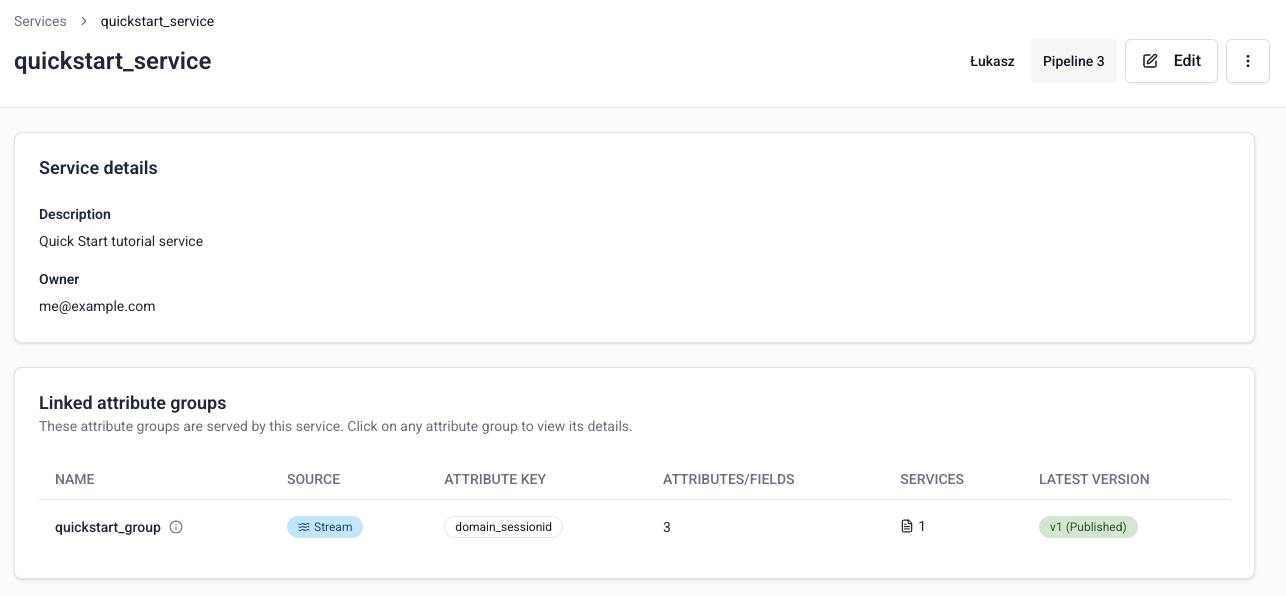
Services group attribute groups together for serving to your applications. Go to Signals > Services in Console and click Create service.
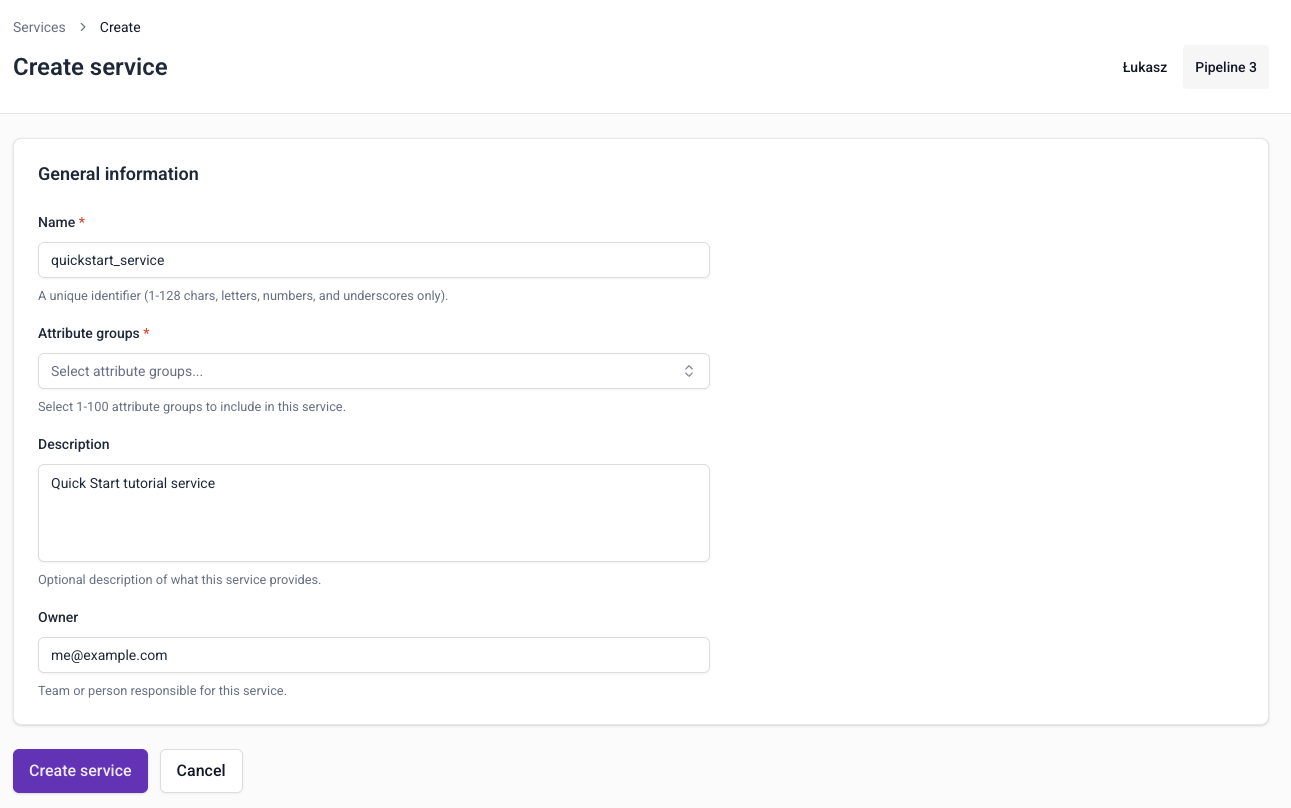
Specify the configuration for your service:
- Name:
quickstart_service - Description: Quick Start tutorial service
- Owner: your email address
To add the attribute group, click the attribute group selector, then search for and select quickstart_group (v1). If it isn't listed, check that you published it in the previous step.
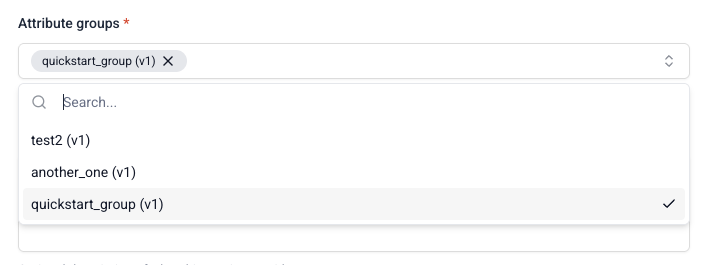
Click Create service. Services are published as soon as they're created.
Find your session ID
Signals calculates the attributes in real time, within the session. To retrieve them, you need the session ID for your own browsing session.
Use the Snowplow Inspector browser extension on your web application. Click around to generate some page view events, then find the Domain Session ID in the Inspector.

In your application code, read the session ID from the tracker instead, as described in getting cookie values.
Connect with the Python SDK
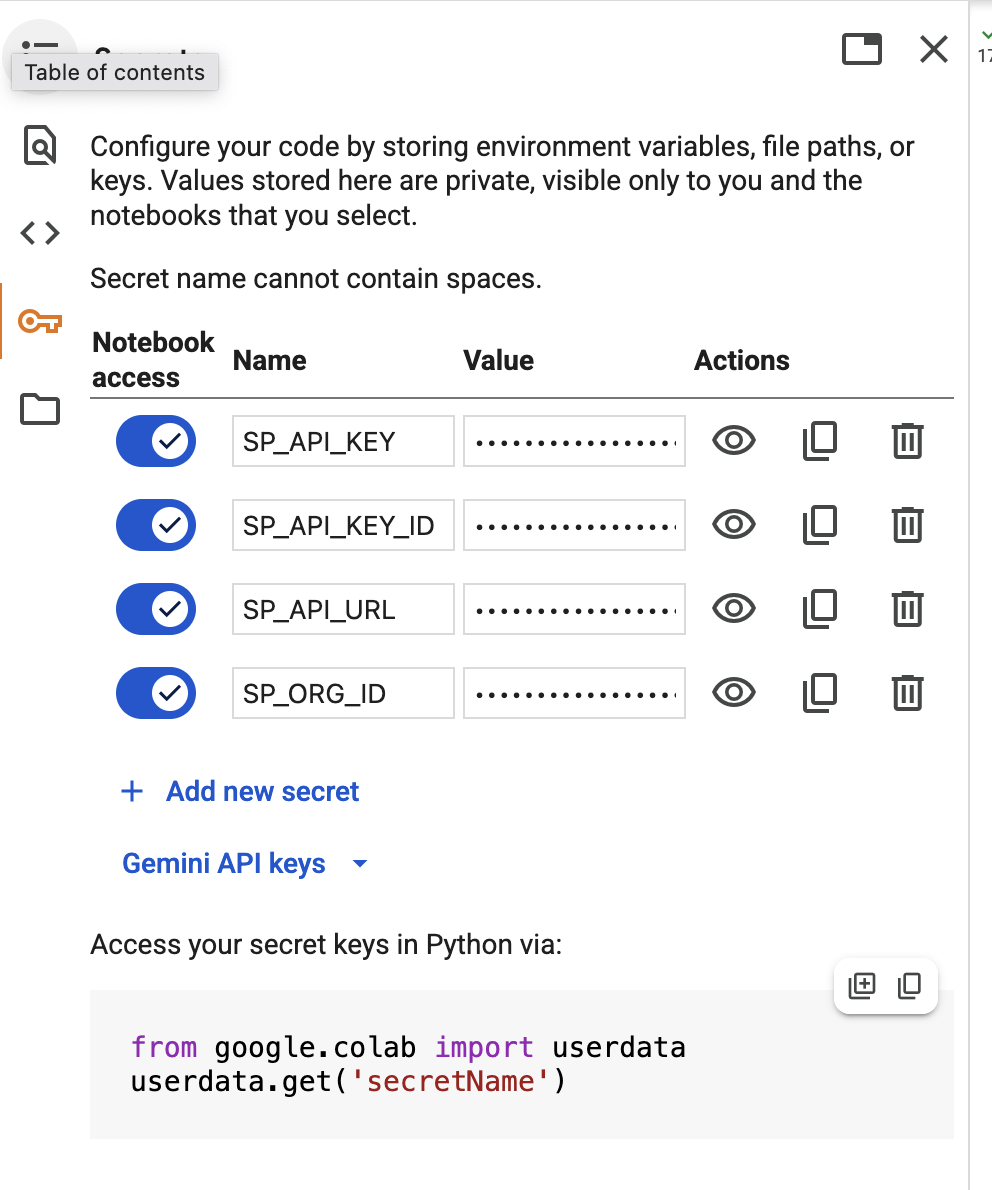
Go to Signals > Overview in Console to find your Signals connection credentials, and add them to your notebook secrets.
Install the SDK:
%pip install snowplow-signals
Connect to Signals:
from snowplow_signals import Signals
from google.colab import userdata

sp_signals = Signals(
    api_url=userdata.get('SP_API_URL'),
    api_key=userdata.get('SP_API_KEY'),
    api_key_id=userdata.get('SP_API_KEY_ID'),
    org_id=userdata.get('SP_ORG_ID'),
)
Retrieve your session attributes
Use your session ID to retrieve the attributes that Signals has calculated for your session:
- Python
- Node.js
import pandas as pd

attributes = sp_signals.get_service_attributes(
    name="quickstart_service",
    attribute_key="domain_sessionid",
    identifier="472f97c1-eec1-45fe-b081-3ff695c30415", # UPDATE THIS
)

pd.DataFrame([attributes])
To retrieve the attributes from Node.js instead of the notebook, install @snowplow/signals-node and create a client from the same credentials, as described in Connect to Signals:
import { Signals } from '@snowplow/signals-node';

const signals = new Signals({
  baseUrl: process.env.SIGNALS_API_URL,
  apiKey: process.env.SNOWPLOW_API_KEY,
  apiKeyId: process.env.SNOWPLOW_API_KEY_ID,
  organizationId: process.env.SNOWPLOW_ORG_ID,
});

const attributes = await signals.getServiceAttributes({
  name: "quickstart_service",
  attribute_key: "domain_sessionid",
  identifier: "472f97c1-eec1-45fe-b081-3ff695c30415", // UPDATE THIS
});
console.log(attributes);
The result looks something like this:
page_view_count | most_recent_browser | first_referrer |
|---|---|---|
| 2.0 | Firefox | snowplow.io |
To retrieve individual attributes without a service, use the get_group_attributes() method:
attributes = sp_signals.get_group_attributes(
    name="quickstart_group",
    version=1,
    attributes=["page_view_count"],
    attribute_key="domain_sessionid",
    identifier="472f97c1-eec1-45fe-b081-3ff695c30415", # UPDATE THIS
)

pd.DataFrame([attributes])
If the values are empty, generate a few more page views and try again. Signals only calculates from events received after you published the attribute group.
Clean up
The tutorial's attribute group keeps calculating attributes while it's published. When you've finished, unpublish and delete quickstart_service and quickstart_group, in Console or with the Python SDK's unpublish and delete methods. The configuration workflow explains how unpublishing and deleting work.
To keep exploring, try calculating the same attributes against domain_userid instead of the session, define attributes from other event types, or retrieve attributes in your application. The interventions tutorial and the prospect scoring tutorial build on these steps.