Snowplow MCP server
Snowplow MCP is a remote Model Context Protocol (MCP) server that lets AI assistants interact with your Snowplow Console account using natural language.
The MCP server exposes the same set of tools as the Snowplow Assistant, but in your choice of harness and model. The server authenticates through your existing Snowplow Console login via OAuth, or with a Console API key to avoid re-authenticating — see Authentication.
One-line install (Claude Code, Cursor)
The recommended way to install Snowplow MCP is with the plugins CLI, a vendor-neutral installer that auto-detects supported AI tools. From any terminal, run:
npx plugins add snowplow/skills
This installs the Snowplow MCP server plus six bundled skills — tracking-design, implementation-guidance, signals, pipeline-infrastructure, console-operations, and troubleshooting — into any detected agent tool in a single step. The plugin source lives at github.com/snowplow/skills.
The plugins CLI auto-detects Claude Code and Cursor. Pass --target claude-code or --target cursor to scope the install to a specific tool.
On first use, your tool opens a browser for OAuth against Snowplow Console — see Authentication for the permissions model.
The bundled skills are loaded on demand by the model. Claude or Cursor automatically engages the relevant skill when you ask about tracking design, pipeline troubleshooting, or any of the other areas. There is no slash command to run.
Install with the Claude Code plugin marketplace
If you use Claude Code, you can install the Snowplow plugin from its native marketplace instead. Register the marketplace and install the plugin from inside Claude Code:
/plugin marketplace add snowplow/skills
/plugin install snowplow@snowplow
This installs the Snowplow MCP server plus the same six bundled skills as the plugins CLI. Claude Code reads the plugin directly from the repository and updates it automatically when the repository changes.
Prefer a single command across Claude Code, Cursor, and Codex? Use the vendor-neutral plugins CLI instead.
Configure the MCP server
Configure Snowplow MCP manually using the snippets below for your tool of choice.
- Claude.ai
- Claude Desktop
- Claude Code
- Codex CLI
- Codex UI
- Cursor
Claude.ai supports remote MCP servers as custom connectors. To add Snowplow MCP:
- Open Claude.ai and navigate to Settings.
- Under Connectors, click Add connector.
- Fill in the connector details:
- Name:
Snowplow MCP - URL:
https://console.snowplowanalytics.com/api/agent/mcp
- Name:
- Expand Advanced settings and enter the OAuth Client ID:
NxCcdyu13Cr4umnIYw70evvUyRXRvyWf - Click Add.
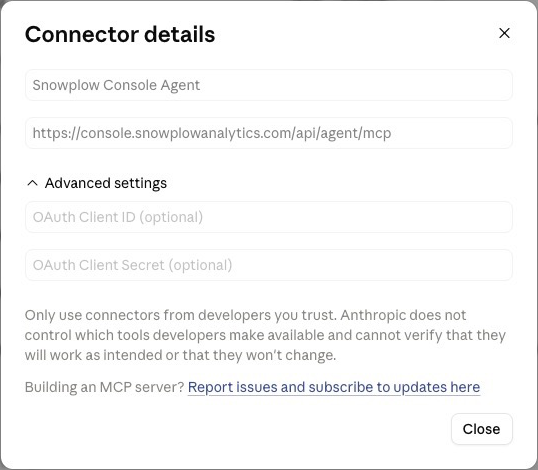
Claude.ai will redirect you to the Snowplow login page to authorize access.
The custom connector method also works for Claude Desktop. But in case you don't have access to custom connectors, you can configure it directly in Claude Desktop using mcp-remote
Add the following to your Claude Desktop configuration file:
- macOS:
~/Library/Application Support/Claude/claude_desktop_config.json - Windows:
%APPDATA%\Claude\claude_desktop_config.json
{
  "mcpServers": {
    "snowplow-mcp": {
      "command": "npx",
      "args": [
        "-y",
        "mcp-remote",
        "https://console.snowplowanalytics.com/api/agent/mcp",
        "3334",
        "--static-oauth-client-info",
        "{\"client_id\":\"NxCcdyu13Cr4umnIYw70evvUyRXRvyWf\"}"
      ]
    }
  }
}
Restart Claude Desktop after saving. On startup Claude Desktop opens a browser window for Snowplow login and caches the token locally for subsequent sessions.
Add a remote MCP server to Claude Code by running:
claude mcp add snowplow-mcp \
  --transport http \
  --client-id NxCcdyu13Cr4umnIYw70evvUyRXRvyWf \
  --callback-port 3334 \
  https://console.snowplowanalytics.com/api/agent/mcp
Run the "mcp" command, select the "snowplow-mcp" and then "Authenticate". This should open a browser page for Snowplow login.
Add a remote MCP server to Codex CLI by running:
codex mcp add snowplow-mcp -- \
  npx mcp-remote \
  https://console.snowplowanalytics.com/api/agent/mcp \
  3334 \
  --static-oauth-client-info \
  '{"client_id":"NxCcdyu13Cr4umnIYw70evvUyRXRvyWf"}'
Codex will redirect you to the Snowplow login page to authorize access.
- Open Codex and navigate to Settings > MCP servers > Add server > STDIO.
- Fill in the server details:
- Name:
Snowplow MCP - Command to launch:
npx - Arguments (one per row):
mcp-remotehttps://console.snowplowanalytics.com/api/agent/mcp3334--static-oauth-client-info{"client_id":"NxCcdyu13Cr4umnIYw70evvUyRXRvyWf"}
- Name:
- Click Save.
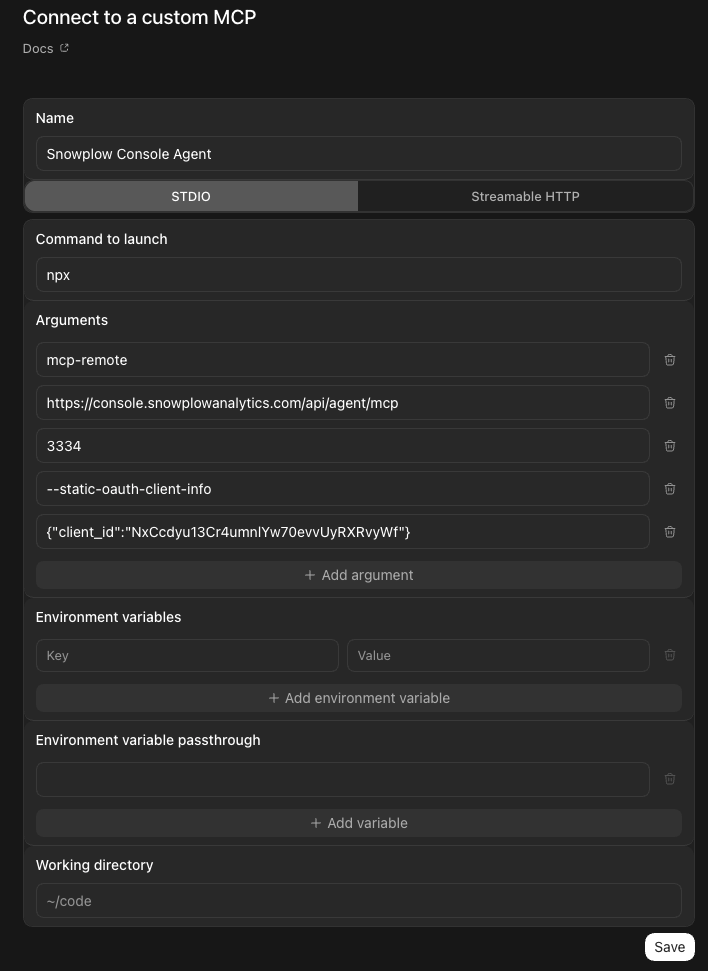
Codex will redirect you to the Snowplow login page to authorize access.
- Open Cursor and navigate to Settings > Cursor Settings > Tools & MCPs.
- Click New MCP Server. This opens the
mcp.jsonconfiguration file. - Add the following configuration:
{
  "mcpServers": {
    "snowplow-mcp": {
      "command": "npx",
      "args": [
        "-y",
        "mcp-remote",
        "https://console.snowplowanalytics.com/api/agent/mcp",
        "3334",
        "--static-oauth-client-info",
        "{\"client_id\":\"NxCcdyu13Cr4umnIYw70evvUyRXRvyWf\"}"
      ]
    }
  }
}
- Save the file and return to Tools & MCPs. The server should appear in the list.
Cursor will redirect you to the Snowplow login page to authorize access.
Authentication
OAuth and API keys are the two ways to authenticate with your Snowplow Console account. Both give the assistant access to one organization at a time, limited to what the credentials allow.
OAuth
The configurations above use OAuth. On first connection, your tool opens a browser to authorize against Snowplow Console, and the assistant then operates with the same permissions as your user account — it can access and modify only what you can.
OAuth uses the organization your account belongs to by default. To target a different organization that your user has access to, add an X-Org-Id header with the organization ID, found on the Manage organization page in Console. With mcp-remote, append these entries to the args array of any configuration above:
"--header",
"X-Org-Id:<ORGANIZATION_ID>"
API key
Authenticate with a Snowplow Console API key to avoid repeated browser logins. Unlike OAuth tokens, which expire and prompt a fresh login, an API key is a long-lived credential passed as HTTP headers, so the connection keeps working without interruption.
First, create an API key in Console and note the API key ID and the API key. From the same Manage organization page, copy your organization ID. Then configure the server with the X-Org-Id, X-Api-Key-Id, and X-Api-Key headers:
{
  "mcpServers": {
    "snowplow-mcp": {
      "command": "npx",
      "args": [
        "-y",
        "mcp-remote",
        "https://console.snowplowanalytics.com/api/agent/mcp",
        "--header",
        "X-Org-Id:<ORGANIZATION_ID>",
        "--header",
        "X-Api-Key-Id:<API_KEY_ID>",
        "--header",
        "X-Api-Key:<API_KEY>"
      ]
    }
  }
}
By default, API keys are created with all permissions, which may be broader than you intend for an assistant. The assistant can perform any action the key allows. If you need the assistant to operate with limited permissions, use OAuth instead, which is scoped to your user account. Store the key securely and only use this method in environments you trust.
Capabilities of the server
The MCP server gives your AI assistant read and write access to the main areas of Snowplow Console. The full list of tools is visible in your MCP client after connecting.
- Data structures and schemas — browse, inspect, and create data structures, and search Iglu Central for reusable public schemas.
- Event specifications and tracking plans — manage event specifications and tracking plans, and view event volume metrics.
- Source applications — manage source applications and their associated entities.
- Pipelines — inspect pipeline configuration, health metrics, and collector settings, including Snowplow Micro instances.
- Failed events and data quality — investigate failed events and manage data quality alerts.
- Enrichments — view and update enrichment configurations.
- Data catalog — browse and search tracked data structures.
- Signals — manage the full Signals workflow, including attribute groups, services, interventions, and publishing to compute engines.
- Documentation — fetch pages from the Snowplow documentation site for quick reference.
Example prompts
After connecting, try asking your assistant:
- "What pipelines do I have and what's their current status?"
- "Show me the failed events from the last 24 hours"
- "Create a new event specification for a signup_completed event"
- "What enrichments are enabled on my production pipeline?"
- "Search the data catalog for anything related to ecommerce"