Create report table
Data from the snowplow_fractribution dbt package should now be in your warehouse. Next we need to create the report table. There are three ways to to this - by pulling a Docker container image, or with Python locally, using the scripts in the utils folder in the dbt package, or if you are on Snowflake you can run the python via Snowpark (recommended).
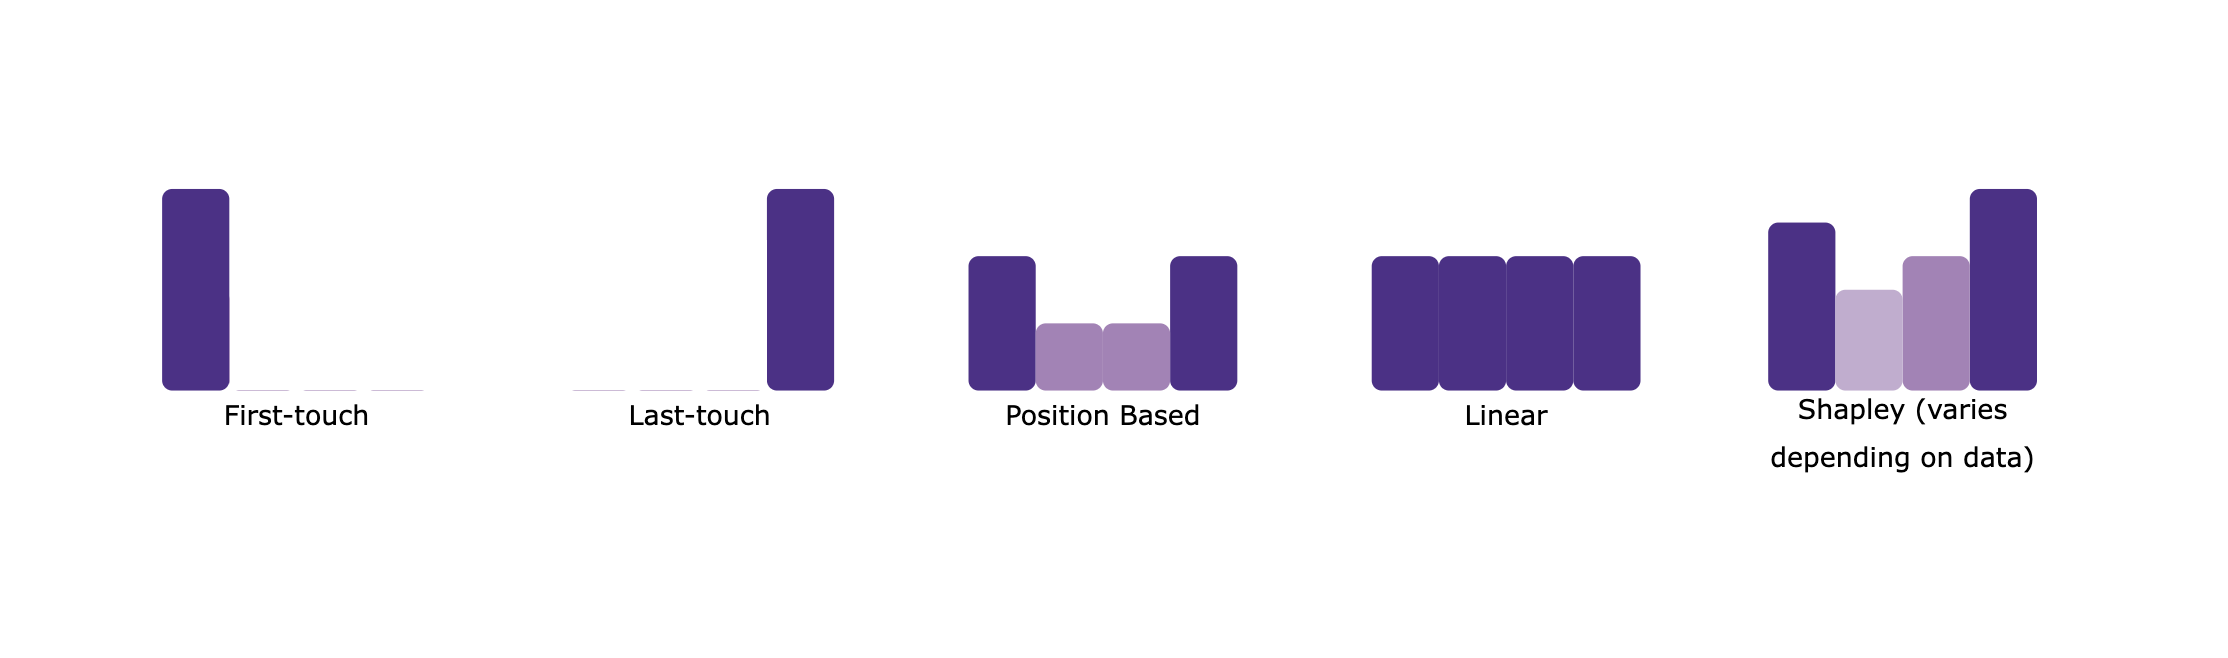
All methods support the choice of a variety of attribution models types:
shapley(default): Takes the weighted average of the marginal contributions of each channel to a conversionfirst_touch: Assigns 100% attribution to the first channel in each path.last_touch: Assigns 100% attribution to the last channel in each path.position_based: The first and last channels get 40% of the credit each, with the remaining channels getting the leftover 20% distributed evenly.linear: Assigns attribution evenly between all channels on the path.
 |
|---|
| Attribution Models |
Pull the docker image
To run the attribution script using Docker, make sure that you have Docker installed.
Once you have docker installed, you can pull the image from the Docker Hub:
docker pull snowplow/fractribution:latest
You can also choose which version of the Docker image you need, in case you would like to use an older version of snowplow-fractribution dbt package:
docker pull snowplow/fractribution:0.1.0
Set your environment variables
Add the necessary connection parameters to an environment file (e.g. configs.env) which will differ depending on the data warehouse you are using. Regardless of your data warehouse, you need to provide the conversion window start and end date, the warehouse you are using (one of snowflake, bigquery, databricks, or redshift) and optionally the attribution model if you wish not to use the default, e.g.:
conversion_window_start_date=2022-06-03
conversion_window_end_date=2022-08-01
warehouse=snowflake
attribution_model=first_touch
Then also include one of the following sets of variables:
BigQuery:
project_id=project_id
bigquery_dataset=bigquery_dataset
Databricks:
databricks_schema=databricks_schema
databricks_server_hostname=databricks_server_hostname
databricks_http_path=databricks_http_path
databricks_token=databricks_token
Snowflake:
snowflake_account=my_account
snowflake_user=sf_user
snowflake_password=password
snowflake_user_role=special_role
snowflake_warehouse=warehouse_name
snowflake_database=database_name
snowflake_schema=schema_name
Redshift:
redshift_host=redshift_host
redshift_database=redshift_database
redshift_port=redshift_port
redshift_user=redshift_user
redshift_password=redshift_password
redshift_schema=redshift_schema
Run the image
Then run the Docker image and pass in the filepath of the .env file:
docker run --rm --env-file /path/to/env/file/configs.env -it snowplow/fractribution:latest
If you are using Bigquery, mount your service account keyfile as a volume: docker run --rm --env-file /path/to/env/file/configs.env -v /path/to/yourkeyfile.json:/keyfile.json -it snowplow/fractribution:latest
Create the environment
Python scripts and requirements.txt can be found at [dbt_project_name]/dbt_packages/snowplow_fractribution/utils/. To run the attribution script locally in Python, we recommend using a virtual environment. E.g.:
conda create --name fractribution_env -c https://repo.anaconda.com/pkgs/snowflake python=3.8 absl-py
conda activate fractribution_env
M1 Macbook Instructions (for Snowflake only) There is an issue with running Snowpark on M1 chips. A workaround recommended by Snowflake is to set up a virtual environment that uses x86 Python:
CONDA_SUBDIR=osx-64 conda create -n fractribution_env python=3.8 absl-py -c https://repo.anaconda.com/pkgs/snowflake
conda activate fractribution_env
conda config --env --set subdir osx-64
Install the packages
Depending on your warehouse you will need different packages, run conda install package_name_and_version to prepare your virtual environment:
BigQuery:
absl-py==1.2.0,
google-cloud-bigquery==3.5.0
Databricks:
absl-py==1.2.0,
databricks-sql-connector==2.1.0
pandas
Snowflake:
absl-py==1.2.0,
snowflake-snowpark-python==0.11.0
Redshift:
absl-py==1.2.0,
redshift_connector==2.0.910
Set environment variables
You now need to set the connection parameters to your warehouse on the command line by replacing the values after the = signs, these will vary by your warehouse:
BigQuery:
export project_id=project_id\
export bigquery_dataset=bigquery_dataset
Databricks:
export databricks_schema=databricks_schema\
export databricks_server_hostname=databricks_server_hostname\
export databricks_http_path=databricks_http_path\
export databricks_token=databricks_token
Snowflake:
export snowflake_account=my_account\
export snowflake_user=sf_user\
export snowflake_password=password\
export snowflake_user_role=special_role\
export snowflake_warehouse=warehouse_name\
export snowflake_database=database_name\
export snowflake_schema=schema_name
Redshift:
export redshift_host=redshift_host\
export redshift_database=redshift_database\
export redshift_port=redshift_port\
export redshift_user=redshift_user\
export redshift_password=redshift_password\
export redshift_schema=redshift_schema
Run the script
Now you can run the attribution script, optionally choosing a specific attribution model.
Run the correct python script for the data warehouse you are using. If you wish to use the default (shapley), no model flag is needed. But you do need to specify the start and end dates for the conversion window. E.g.:
python main_snowplow_snowflake.py --conversion_window_start_date '2022-06-03' --conversion_window_end_date '2022-08-01'
Otherwise you may add a flag indicating the attribution model to use, e.g.:
python main_snowplow_bigquery.py --conversion_window_start_date '2022-06-03' --conversion_window_end_date '2022-08-01' --attribution_model shapley
If you are using Snowflake as your data warehouse the package includes the functionality to run the required python in warehouse as part of the dbt package. To enable this, you simply need to set the snowplow__run_python_script_in_snowpark to true and snowplow__attribution_model_for_snowpark to your chosen attribution model type in your dbt_project.yml e.g.:
# dbt_project.yml
...
vars:
  snowplow_fractribution:
    snowplow__run_python_script_in_snowpark: true
    snowplow__attribution_model_for_snowpark: 'last_touch'
You can then either run just the required model if you have already run the package without these set, or in the future this will now run as part of the package so there is no need to call this individually.
dbt run --select snowplow_fractribution_call_snowpark_macros
The output of the analysis will be built into the schema specified in your connection parameters. There are three tables that will be created are:
snowplow_fractribution_report_table: The main output table that shows conversions, revenue, spend and ROAS per channel.snowplow_fractribution_channel_attribution: The conversion and revenue attribution per channel (used to create the report table).snowplow_fractribution_path_summary_with_channels: An intermediate table that shows, for each unique path, a summary of conversions, non conversions and revenue, as well as which channels were assigned a contribution.